
To go from those lower notes on the saxophone to the upper notes, we need to first learn about an important transition.
In this lesson we’re going to learn about the octave key on alto saxophone.
Your Beginner Saxophone Quickstart
Thanks so much for joining me for part four of our Beginner Saxophone Quickstart course. Here’s quick reminder of what we’ve covered so far.
- In Part 1 we talked about putting our saxophone together and getting our first sound.
- In part 2 for alto and tenor, we talked about tonguing, and we learned our first song.
- In part 3, we learned a whole bunch of notes and another great song (find the alto and tenor lessons here).
But this is part 4, and today we’re talking about the alto saxophone.
If you’re a tenor saxophone player, or a soprano player, click here for your lesson.
Right, let’s get stuck in.
What is the octave key on alto saxophone?
So today I want to show you an important new key on the saxophone. And that’s on the back of our saxophone, called the octave key.
Now the octave key is important because it opens up the whole second octave of the saxophone.
And the coolest part about this is you can use all the notes you learned in the previous lesson again – but up an octave.
What is an octave?
If you haven’t heard the term octave before, it simply means the same note but eight notes above. Do you remember in the last lesson we spoke about how in music we use the first seven letters of the alphabet?
And when you go from A through to G, the next note above is A again. So A, B, C, D, E, F, G, A. So the distance between those two As is an octave.

And on the saxophone, we’ve got two and a half octaves to play around with in the standard range.
So, let’s now dig into how we can start to use the octave key on alto saxophone.
How to use the octave key
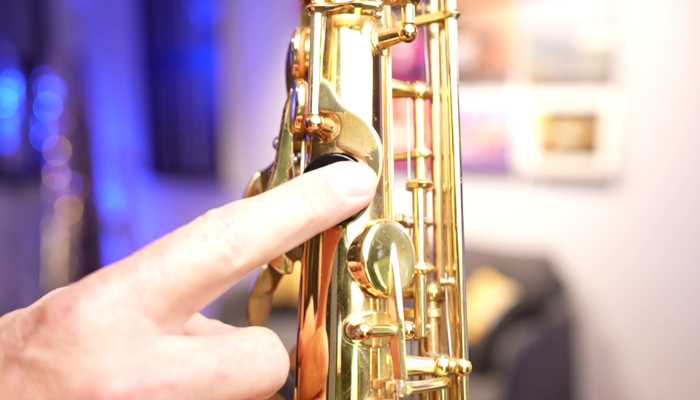
So the octave key that I mentioned at the start is what we use on the saxophone to get into the second octave. And we operate it using our left thumb.
Now you must use good movement when you’re operating the octave key. The best way to think about this is to put the heel of your thumb against the button on the back of the saxophone, and then just move the tip of your thumb in a rocking motion to activate the key.

What you want to avoid is any big movements where you’re moving your entire thumb, your hand, and your wrist around at the same time. Try and isolate that movement just to the tip of your thumb.
First note with the octave key
So let’s learn our first note with the octave key. We’re going to use the note D.
Now you’ll remember in the last lesson we learned note D as six fingers. So that’s the three fingers of the left hand and the three fingers of the right hand.
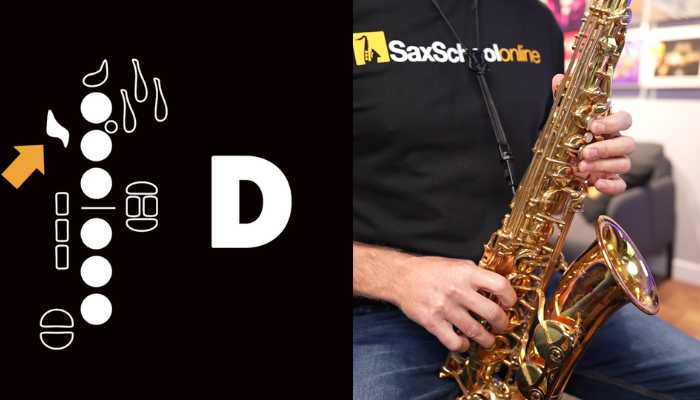
What I want you to do now is to pop all six fingers down as well as the octave key by just pivoting the tip of your thumb, to press down that octave mechanism.
Listen to what it sounds like.
Okay, let’s try that D together.
So remember:
- Make a nice voo shape with your mouth
- Breathe deeply and push lots of air through the saxophone
- And you could also start this note with a tongue.
Here we go.
Transition from Middle D to C
Now we’re going to talk about how to move from a note with an octave key on, to a note with the octave key off.
So, what we’re going to do is go from the note D that we’ve just learned – middle D, down to the note C. Ooh, this is a tricky one.
Do you remember C from the last lesson? That’s simply just the middle finger of your left hand and nothing else.

Listen to how C sounds.
Okay, without playing, let’s work on that movement.
- So, let’s start with our fingers down for C.
- Now let’s add all six fingers and our octave key for D.
- Let’s go back to C, and then back to D.
Be careful here that all of your D fingers are moving at the same time when we transition from D to C.
So we don’t want any blippy, slow fingers. Let’s try it again.
Now let’s see if we can play that movement, but let’s do it very slowly. So we’re going to start with C, and then we’re going to move to D. Here we go.
Fix your fingers
Now it could be that you’re getting some little extra notes in there. If you have, then you’ve got fingers that are moving too slow or too fast.
So just try and think about which finger is moving too fast or too slow, and see if you can get them to all move together.
Practice in a Song
Right, I think it’s time to put this into action in a song.
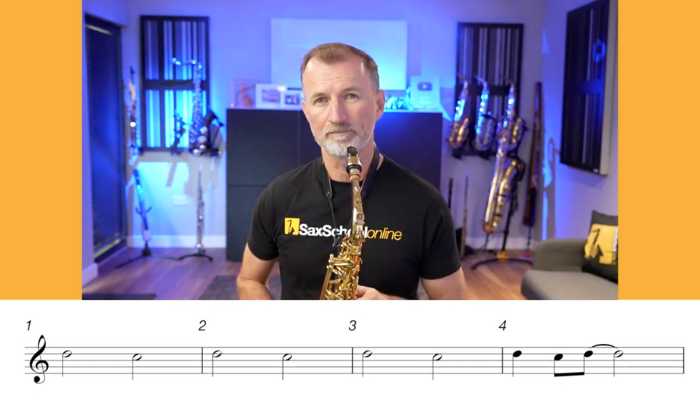
And I’ve written a cool little song for you, and it’s called ‘Dee Cee Blues’. Now it’s not actually a blues! But it does use the notes D and C, so I think you can understand where I’m going with this.
Okay, this song is easy to learn because it’s a four-bar pattern this time, that repeats twice.
So have a listen to how the four bars sound first, and then we’ll learn the notes.
Dee Cee Blues: The notes
Okay, let’s look at the notes then.
So it starts on the note D – that’s for two counts.
And then we go down to C for two counts.
Then we do that again. Back to D for two counts. Back to C for two counts, back to D for two counts, and back to C for two counts.
And then the fourth bar goes like this – D, C, D. We need to make sure our fingers are even there.
Let’s do that last bar one more time. D, C, D.
Okay, so let’s run through the fingers only for that whole four-bar pattern.
Now in this song, all we need to do is play that four bars once at the start, and then a second time, and that’s pretty much it.
The only other thing that happens is the very last note, which is just a nice long D with the octave key on – our middle D.
Practice with the backing track
I think we’re ready to start playing this song with the backing track. Let’s play it through all the way together.
Don’t forget you can slow it down if you need to use the player controls.
I want you to think about starting every note with your tongue, and breathing nice and deeply. And see if you can get a lovely round shape with your embouchure as well.
Try Sax School Online
You know, you should be super proud of yourself. Because in just these four short videos, you’ve gone from learning how to put your mouthpiece together, all the way through to learning three cool tunes, and a bunch of skills that will set you up for learning amazing stuff on your saxophone.
What are you going to do now? Because the next steps are important to you.
You need to get the right courses, the right lessons, and the right support from great teachers to keep your momentum going.
And that’s one of the reasons I’ve been building Sax School for the last 10 years. It’s also why we’ve helped tens of thousands of students.
So if you’d like to find an easier way to get moving with your progress, Sax School can help you.
Whether you want to learn jazz or pop or music for church or classical music – maybe you just want to learn for yourself so you can play for your family and friends – Sax School is going to help you to get there.
There are over a thousand lessons in there, organised into clear learning pathways and courses.

Plus, we’ve got a huge team of teachers now. We do live sessions every month where you can come along and get direct feedback from a teacher. There’s everything in there that you need to help you make fast progress, and that’s why our students do so well.
We’ve got a 14-day free trial available at the moment. And I’d love to see you in there and start helping you inside Sax School, and see what you’re able to do on your saxophone.
Even if you’re not quite ready to get started with Sax School, please go check out all the other stuff on our YouTube Channel and on our blog. There’s so much that’s going to help you.
Keep practising hard. I’ll catch you next time.