
Thanks for joining me for Part 3 of the Beginner Saxophone Quickstart Course.
In this lesson we’re going to learn our first notes on tenor saxophone.
We’re going to learn our first six notes. I might even show you seven. And we’re going to learn a cool tune as well.
In Part 1 of our Quickstart course, we talked about how to assemble your saxophone, your mouthpiece, and your reed.
And in Part 2, we talked about tonguing, and we learned our very first song.
Alto Players
Now this lesson is for tenor saxophone. If you are an alto (or bari) sax player, click here to go to your lesson.
If you want to check out the previous lessons in this series, all the links are below. And I would suggest you go check out the previous lessons before digging into this one today.
About your hand placement: Left Hand
Let’s get cracking straight away and talk about our left hand. Now if you’ve got your saxophone handy, grab it now and you can work through this lesson with me.
In the first lesson in this series, we spoke about where to stick your thumbs on the saxophone.
So your left thumb goes on the button at the back, at the top of the saxophone.

And then your right thumb goes underneath the hook that’s at the back, down toward the bottom of the saxophone.
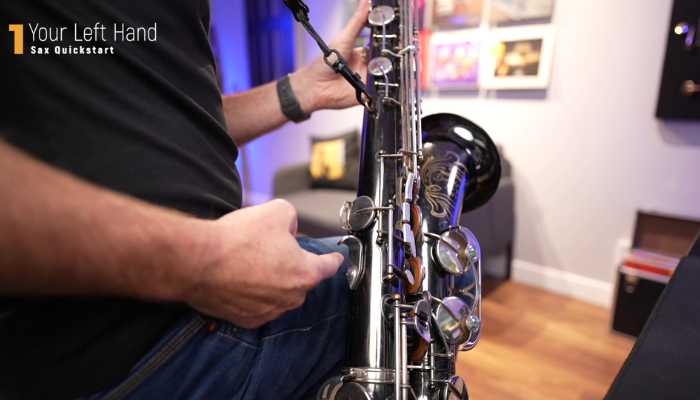
So get your thumbs in the right position, and then let’s talk about our left index finger.
First notes on tenor saxophone: How to play B
So, sometimes saxophones can look different than mine here. But if you look at the front of my saxophone you can see at the very top I’ve got this spatula-shaped key. We’re not going to use that one. Instead, we’re going to stick our first finger on the first pearl just below that.
See how that feels underneath your fingers with our first finger pushing down that pearl. That’s the note B. Listen to how it sounds.

So have a go at playing the note B.
Remember to get that voo shape that we talked about in lesson one and use lots of air as well. So push the air out from right down to the bottom of your lungs down here to fill the saxophone up with air.
How to play A
So let’s move on to the second note. So if we look just below the B key, we’ve got this tiny little pearl. We’re not going to use that one. We’re going to skip it and instead put our middle finger on the second pearl.
So those two fingers down together is the note A. Listen to how it sounds.

How to play G
So, the third note on our left hand is the next pearl, straight down, and that’s with our ring finger. So three fingers down is the note G. Listen to how it sounds.

Putting the first notes on tenor saxophone together
Alright, awesome. So let’s try playing all of those three notes, one after the other. We’re going to start with B, and then we’re going to move to A. And then we’re going to move down to G.
I would like you to start every note with our tongue. Are you ready? Here we go.
What’s inside Sax School PRO
It’s fun to learn a song like we’re going to learn in the lesson today. But imagine if you had access to a thousand lessons and hundreds of other songs. Plus imagine if you had access to sessions where you can come along and have live stream sessions with a tutor and get help.
I mean, that’s an amazing thing. And all of that is what’s included inside Sax School. Now, as I’m filming this, we have got a 14-day trial running.
We’re helping thousands of students every single day. If you want to check out what we’re doing, click here to get the 14 day free trial.
Your Right Hand
Let’s have a look at our right hand. Now it’s important to know that with saxophone we only put our right fingers down if our left hand fingers are down first.
So we’re always adding fingers on as we go down the saxophone.
How to play F
There are just three pearls on the right hand for our saxophone, which makes it dead easy. Our index finger goes on the top one, and that’s the note F. Listen to the sound.

The Note E
If we add our second finger, then we get the note E.

Playing D
And by adding our 3rd finger, our ring finger with our right hand, that means we’ve got 6 fingers down. That’s the note D.

Both hands
Now we have learned our first notes on tenor saxophone. Let’s try all 6 of those notes in order. So we’re going to start with B, and we’re going to work our way down to the note D.
How your saxophone works
Let’s take a minute to talk about the science behind how instruments work.
We all know that bigger instruments, like the baritone saxophone, for example, are low. They sound low. Big instruments sound low.

Whereas tiny instruments, like this little piccolo, sound super high. So long instruments sound low and short instruments sound high.

Now that’s an important thing to remember when we’re learning saxophone. Because when we’re adding fingers on as we’re playing different notes, we’re making the tube longer or shorter.
For example, if we think about note B, the tube is only from the mouthpiece down to just below the B key. That’s kind of short.
Whereas when we play the note D, the tube is longer because it’s from the mouthpiece down to below the D key.
How to play the note C
So like I was saying earlier, just remember, you always need to have your left hand down if you’re having your right hand down. But, just like any good rule, there is an exception to it, and that’s the note C. This is a little bonus extra note that I just want to show you quickly here.
So, the note C is really easy. We just use the middle finger of our left hand just by itself. Listen to how it sounds.
How Music Works
In music we use the first seven letters of the alphabet to name the notes – so A, down to G .
But in music, when we get to G, we go back to A, and it goes around and around forever.
An easier way to think of this is that as we go up the letters in the alphabet, we go up in pitch.

So it gets higher. A, B, C, D, E, F, G, A.
And after we get to G. We go back to A again and we keep going up a G again, then A to G again.
It also works the same in the other direction. So if you know your alphabet backwards, you’re going down lower in pitch. So if we start on A then down to G, F, E, D, C, B, A, G, F, E, D, keep going all the way down.

So now you understand all this, let’s take the first notes on tenor saxophone that we’ve learned and put them into a piece.
Learn a Song: “Walking Home”
So I’ve written a fun little song for us to learn in today’s lesson, called “Walking Home“. And it uses all of those 6 notes and it uses the 7th note as well – the middle C that we learned.
So, the nice thing about this tune is it’s quite repetitive. So you get to play the first 2 bars 3 times. Have a listen now to what the first 2 bars sound like, and then we’ll learn how to play those notes step by step.
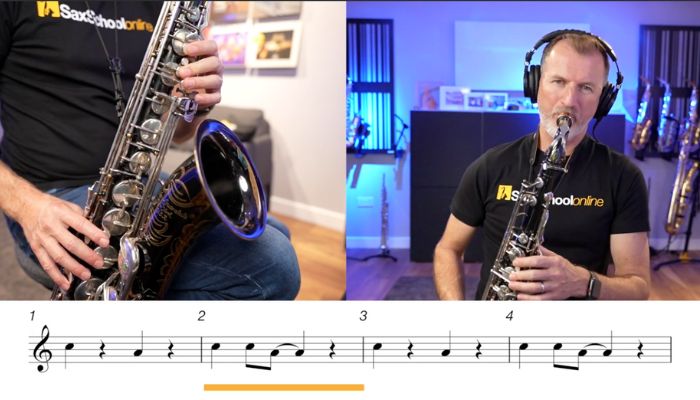
First phrase
Right, let’s learn those notes. So, it starts on the note C. Remember, that’s your middle finger with your left hand.
And then we go down to the A, which is the first two fingers of our left hand. Nothing happened with our right hand here.
So we play C, A, C, C, A, Grab your sax and try that.
Now just a little side note here, it’s a good idea to always practice a new tune like this, just doing your fingers, not even blowing. If you can get your fingers right, then it’s time to start doing some playing. So if you’re comfortable with your fingers, let’s try playing through this now.

Remember:
- Make sure you use the Voo shape from lesson 1
- try starting each of these notes with the tongue – ‘tu’, ‘tu’, ‘tu’, ‘tu’.
Alright, brilliant. Now, if we look at the music, we can see that that pattern happens three times.
There are just two more bars in this piece of music, and that’s a completely different phrase.
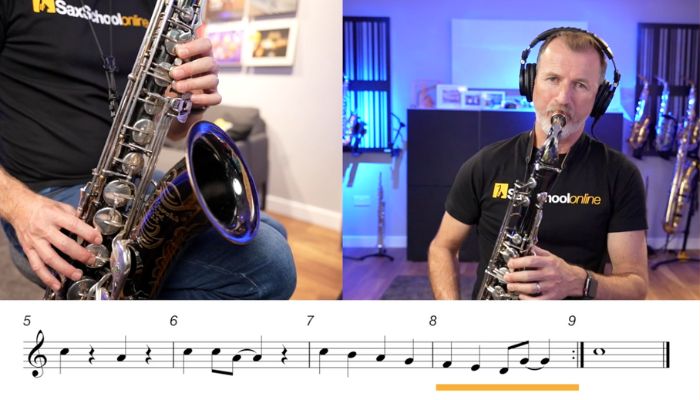
Second phrase
So, let’s look at the notes for those last two bars.
This time we start on note C, and we’re going to run down to low D. So we go C, B, A, G, F, E, and then we go D up to G.
So just think about that movement from D with three fingers of our left hand, and then we lift all three of those fingers to get up to G.
So let’s try moving our fingers one more time and we’re going to kind of do it in tempo this time.
Now let’s just try playing those two bars, but in time with the backing track. Listen to the music so you can come in together with me.
Putting it together
Okay, there are just two more things we need to learn about this piece of music.
First of all, the whole song is repeated. So, we play that first two-bar phrase three times, and then we’ve got that new second two-bar phrase we’ve just learned.
But after that, we go back to the beginning. We play the first phrase three times again, then we play that second phrase. And then we go to our very last note, and for us that’s dead easy. It’s just a nice long C.
Playing through
Let’s have a go at putting it into action. I’m going to put the backing track on and let’s play it all the way through together.
Now don’t forget you can use the speed controls on the video here to slow it down if you just need a little bit more time. Here we go.
Next steps
Hey, that was awesome.
Now you have learned your first notes on tenor saxophone. The next step is to unlock the whole next range on the saxophone. There’s a whole bunch more notes that you can play, and it’s easy to get them out.
I’m going to show you that in the next lesson, plus we’re going to learn a whole new song. That’ll get your fingers going and make you comfortable on the saxophone, particularly with this next important transition.
So keep practising hard, don’t forget to use this lesson as much as you need. I’ll catch you, when you’re ready, in the next lesson.
Here’s where to find the whole Beginner Saxophone Quickstart Course
Getting Started:
Lessons Alto Sax:
Part 2 Tonguing for alto
Part 3 First 6 notes on alto
Part 4 Your second octave on alto
Lessons Tenor Sax:
Part 2 Tonguing for tenor
Part 3 First 6 notes on tenor
Part 4 Your second octave on tenor