A Saxophone fingering chart is an essential tool for learning saxophone, even when you’re an advanced player.
If you are a beginner player, fingering charts can be confusing. I’m going to break down how to use the alto sax fingering chart and how the different elements of the fingering chart apply to the saxophone. Plus, I have some handy tips for you along the way!
Grab this free saxophone notes chart, including Altissimo notes, and keep it handy on your music stand!
This is the same fingering chart that many of our Sax School students use every single day in their practice. I use it in my practice as well!
In this post, you’ll learn:
- The reasons why we need an alto sax fingering chart
- How to use sax fingering chart
- Tips on how to have faster fingers on the saxophone
Get the finger chart for this lesson – plus all of our other free resources.
Free Fingering Chart in Locker
Why do we need a fingering chart?
A saxophone fingering chart is just a reference guide to help you to know what fingers to use when you’re playing different notes on the saxophone. When you’re starting on sax, the number of keys may seem confusing, so a fingering chart is essential to guide you through those first few notes.
Once you’ve got those under your fingers, the next step is to use your finger chart as a reference guide for notes that you don’t use very often, like some trill saxophone fingerings – mainly notes you are uncertain of.
For intermediate and advanced players, you will want to use that saxophone fingering chart to remind you of those awkward altissimo fingers or other notes in the fourth octave that can be quite difficult to get your fingers around and feel very unfamiliar.
So a fingering chart is an essential reference tool that every saxophone player really needs to have.
Our saxophone fingering chart shows you all the correct hand (left hand or right hand) and finger positions (essential for Fast Fingers on sax) for all saxophones from baritone, tenor saxophone and alto saxophone through to soprano saxophone.
Also, our new updated saxophone fingering charts include alternate fingerings for trill keys and an altissimo fingering chart up to 4th octave high F for right and left-hand users!
Alternate saxophone fingerings are really useful for helping you to play faster, smoother lines. They are like a secret weapon when it comes to tackling those tricky, fast passages. If you want to know more, check out this video where I take a close look at alternate fingering for saxophone.
Different saxophones, different fingerings
There are a couple of inconsistencies that you might find between different saxophones. If you are playing a modern saxophone (made after the 1970s,) the keywork is essentially the same.
However, if you are playing on an older or vintage saxophone, sometimes the keywork can look slightly different. Some keys might be a different shape, or you may have a few other options with keys down at the bottom end of the saxophone.
Our great saxophone fingering charts include the basic notes, which you will be able to find on all saxophones, with the possible exception of the top keys, which may look slightly different.
How to use an alto sax fingering chart
If you are a beginner saxophone player or new to fingering charts, then here’s a quick overview. Our fingering chart is broken down into blocks to help you quickly identify the keys and work out which ones to use. First, though, it’s essential to understand the basic idea of how your sax works.
How notes are changed on a saxophone
Your saxophone looks really complicated, but in reality, it is simply a long tube with holes in it.
When we’re adding our fingers onto the saxophone, all we’re really doing is making the tube longer or shorter. Every time we add a finger on, we’re closing off the tubing and making it longer or taking off a finger and making it shorter.
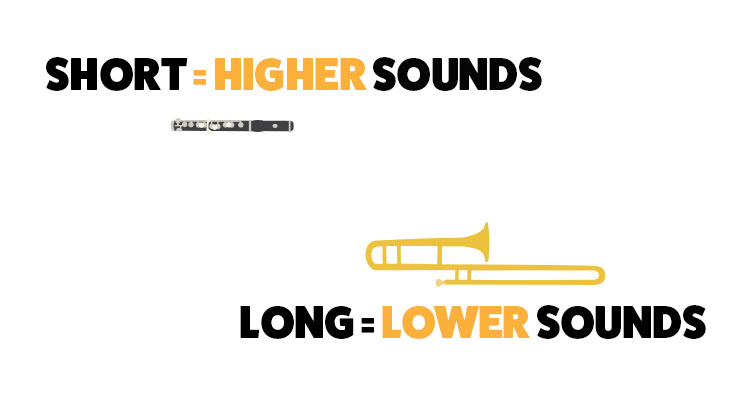
We all know that small or short instruments like piccolos or recorders play really high. Meanwhile, long or big instruments, like trombones or tubas, play really low.
Short = high sounds. Long = low sounds.
When we add a finger on and make our tube longer, we are making the pitch we are producing from the saxophone lower, and as we take a finger off and make the tube shorter, we are making a higher note on the saxophone.
So….
To make the notes on your saxophone sound lower, we need to add a key (or a finger) in order to start from the top and work down.
This is an important point because you’ll always find that our finger patterns work down or up the sax in order.
Another way to think about it is that you’ll need the first one down if you have the second key down. Each key closes a bit more of the saxophone tube off or makes the tube longer (and sound lower).
Got it?
Let’s look at the keys themselves.
Your left hand on the saxophone
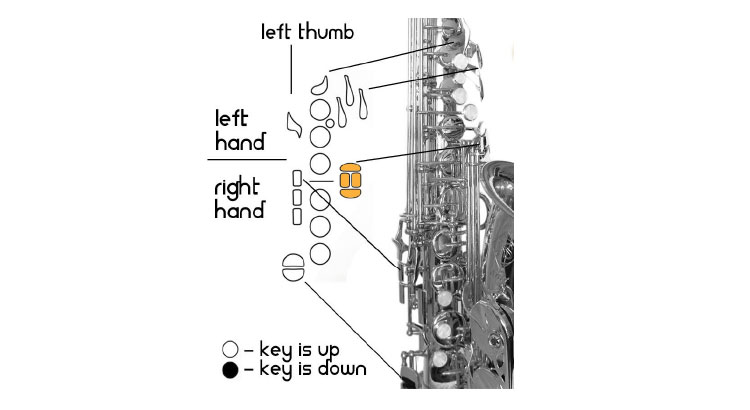
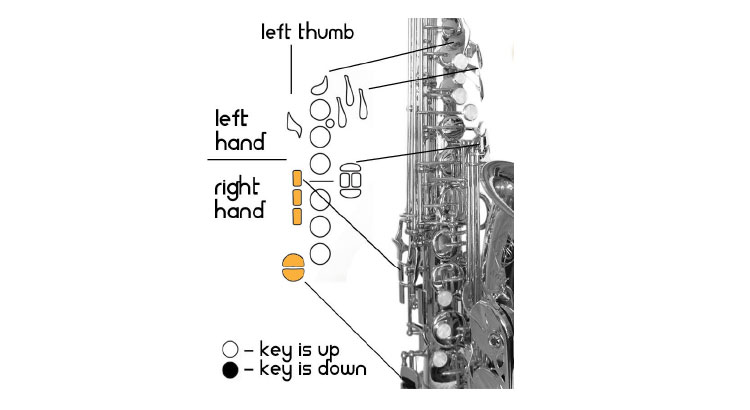
Each one of these funny shapes on the fingering chart represents a key on the saxophone. Simply, if one of these shapes is filled in, it means that we’re pushing that key down. If it’s hollow, it means we’re not pressing it down.
So all you need to do is find the corresponding keys on your saxophone for each of those shapes – if it’s filled in, you put that finger down.
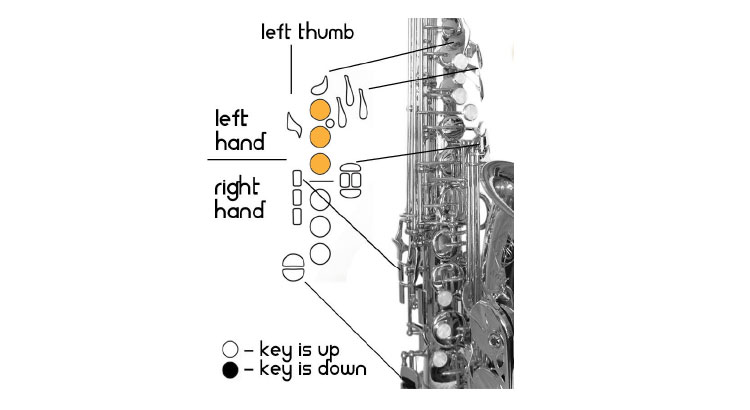
Let’s start with the left hand. Work out where our hand goes on the saxophone and which notes they are on the finger chart.
You’ll notice that you’ve got a round, black, or gold button on the back of your saxophone. It doesn’t move, but that’s where your thumb goes. It’s very important that you locate your thumb on that back button.
And then, if you look at the front of your saxophone, you should be able to see 4 round keys. You may have a fifth key above. On modern saxophones like mine, it’s shaped a bit like a spoon, but on older saxophones, it may be a rounder key. There’s also a small round key, but we are focusing on the 3 larger round keys. The top 3 circles represent these on the finger chart.
We use these three keys in order to play the saxophone with these notes:
B= first key down
A= first 2 keys down
G= first 3 keys down
There’s quite a lot of other stuff going on with our left land, but we will get to that later in this article.
Your right hand on the sax
You’ll notice that there is a little hook for your thumb on the back of your saxophone. This is just a guide, so you know where your hand has to go because your neck strap does all the heavy lifting. You shouldn’t be taking a lot of weight on your thumb.
On the front of the saxophone for the right hand, it’s a bit simpler because every saxophone will have 3 round keys. Your first 3 fingers (index finger, middle and ring finger) go on these keys, with your index finger on the first, middle finger on the second, and ring finger on the third. On the saxophone fingering chart, these are represented by the bottom three circular keys.

To play notes with these right-hand keys, you must first have all three of your left keys pressed down. These are the notes you can get:
F= Right Hand + first key
E= Right Hand + first TWO keys
D= Right Hand + first THREE keys.
There are some extra keys around your right hand but don’t worry. We will get to them later!
Playing a simple melody on saxophone for beginners
Once you identify your three left-hand keys AND your three right-hand keys, you are ready to start making up melodies and having fun on your sax.
So if you’re new to the saxophone, you now know 6 notes: B, A, G, and F, E, D. Try them out and see what melodies you can make up with them.
For example: Mary Had A Little Lamb
B, A, G, A, B, B, B
A, A, A, B, B, B
B, A, G, A,B, B,B, B
A, A, B, A, G.
Now you are rockin’!
In fact, if you are new to the saxophone, make sure to grab my free Toolkit lesson bundle. Or, if you are a Sax School member, check out the Quickstart Getting Started on Saxophone course, which will show you how you can make some great melodies with those six notes too. So have some fun with them! See what you can come up with.
Extra keys on your saxophone
On the back of your sax, your left thumb operates the octave key – that’s the large flat key above your left-hand thumb rest. You use this key with the tip of your left thumb to move the saxophone notes up into the next octave.
When you have your thumb on the button at the back of the saxophone, its heel should be on the button. So, the tip of your thumb can operate the octave key. You should be just moving the tip of the thumb to make that movement as small and efficient as possible.
Your left-hand position on the saxophone
It’s super important that you have your hands naturally and relaxed when you play the saxophone. Often students will have their wrists bent when playing, which causes a lot of strain on their arms AND makes it very difficult to reach the left-hand pinky finger keys.
Instead, your hands should be in a natural “C” shape, and your wrist and your arm in line. Try making your hand and arm in the shape, then move it onto the sax to see the correct position.
It’s also really important to get your neck strap right. When your saxophone is resting on the neckstrap, it should go straight into your mouth. This is even without hunching your shoulders or reaching up or down. Your neck strap should be doing all the heavy lifting and holding the entire weight of the saxophone.
Use a Mirror
It’s a great idea to put a mirror in your practice room to watch your hands, arms, fingers, and body while you’re practicing. You want to ensure there is no tension in your wrist and that you’re not holding your wrist at a weird angle or lifting your fingers off too high.
Extra Left-Hand Keys
Your left hand also operates the side keys, called “Palm Keys.” They are found in the top right of the saxophone fingering chart. They are called palm keys because the palm of our left hand operates them.
With our thumb on the button at the back, we operate these by pushing in sideways. We do it this way because you can have your fingers on top of the 3 pearl finger keys, but you can also just about reach those palm keys. Again, this is about being super efficient, so we can keep your hand basically in one position and operate all those different options.
There’s one more bundle of keys that we operate with our left hand and that’s our pinky keys near the bend of the saxophone. These keys are located in the middle right of the fingering chart.
These keys can feel like a stretch for some people. But if you hold your hand and arm in a natural position, as discussed above, then you’ll be able to reach those keys even if you are really small.
Other right-hand keys on the saxophone
Your right hand has a lot to do with the saxophone. As well to your three pearl keys for F, E, and D, there are also a bunch of other keys to control:
Your right-hand pinky finger has two low-note keys to control. Remember, any time you have these low notes pushed down, you’ll also need to have the other 6 keys pressed down, too (for that long tube and low sound). Again, if your wrist is nice and relaxed, you’ll find it easier to reach these keys.
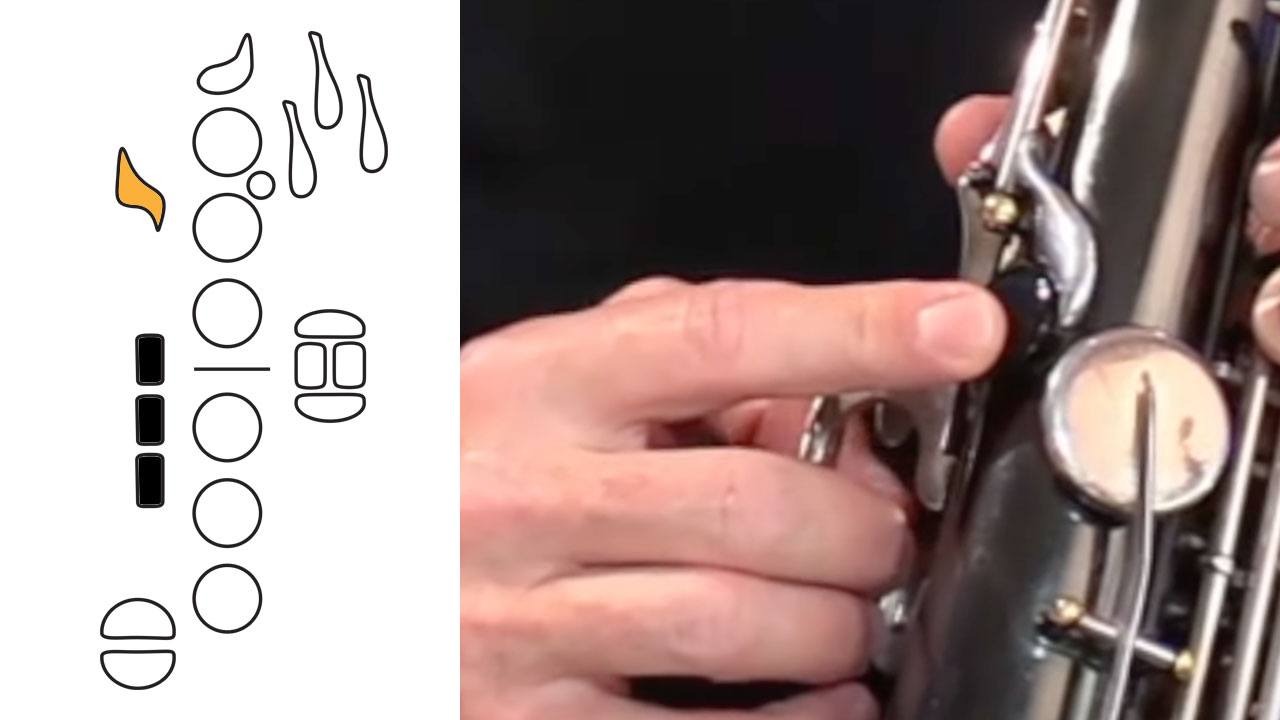
We also have a set of 3 long keys that you can operate with your left-hand index finger. These “side keys” are used for alternative ways to play notes like Bb and C plus your very high F. On some older saxophones, these might be a different shape.
Altissimo Fingerings
If you’re an advanced player, you will want to check out the altissimo fingerings, which are included in our PDF. The altissimo fingerings show you how to play the notes right at the top of the saxophone in the fourth octave. Altissimo notes are more tricky, and depending on your saxophone, you might find that one fingering works better than another, so I’ve included a couple of options for some notes.
So now you know all the notes on the sax fingering chart and how to find them on the alto saxophone. Depending on how new it is, there might be some extra keys on your saxophone. But I wanted to keep the saxophone fingering chart down to the basics that you are going to use most often.
How to have faster fingers on the saxophone
Knowing where to put your fingers is only half of the story. To get those fingers “flying” on your alto or tenor saxophone, you need to first keep your fingers as close to the keys as possible at all times.
In fact, they should be touching the sax always (this is almost impossible but a great goal).
You can work on this by watching your fingers in a mirror as you practice. For more tips, check out my Faster Fingers lesson here.
We also have alternate fingering charts to help you when you are ready, including our alternate B♭ fingering charts here. If you want more tips like this, come over and see what we are doing at Sax School. We’ve got thousands of students using our lessons every day to make great progress, from just starting out, getting back to their saxophone, and getting out gigging.