
If you are a beginner player, the key system on your new tenor saxophone can seem really confusing, and that’s before you even look at a fingering chart. However, as you learn, you’ll understand that the fingering chart is one of the most useful tools in your arsenal for developing fantastic saxophone skills.
In this article, we are going to dig into how you can use a fingering chart to learn more quickly on your saxophone and discover some ways that you can use the saxophone fingering chart to help you learn how to play tenor saxophone even faster.
Free Fingering Chart in Locker
In this article, you will learn:
- The Structure of the Fingering Chart: Dive deep into the layout and understand the chart’s design and functionality.
- Importance of Basics: Discover why starting with foundational skills and scales is vital for long-term mastery.
- Techniques for Regular Practice: Uncover methods to make your daily practice sessions more effective.
- The magic of alternative fingerings: Discover how difficult-to-play passages can become easier by unlocking different ways to approach the same notes.
- Visualization Techniques: Understand the power of mental imagery in enhancing your playing skills.
- Utilizing Online Resources: Explore the myriad of digital aids available to complement your chart and enhance learning.
Tips and Techniques
1. Understand the layout.
Before diving into techniques and tips, it’s essential to grasp the fingering chart’s structure. Each note on the chart corresponds to a specific finger position on the saxophone. It serves as a visual guide, showing which keys to press for each note. Familiarize yourself with this layout before you even pick up your saxophone.
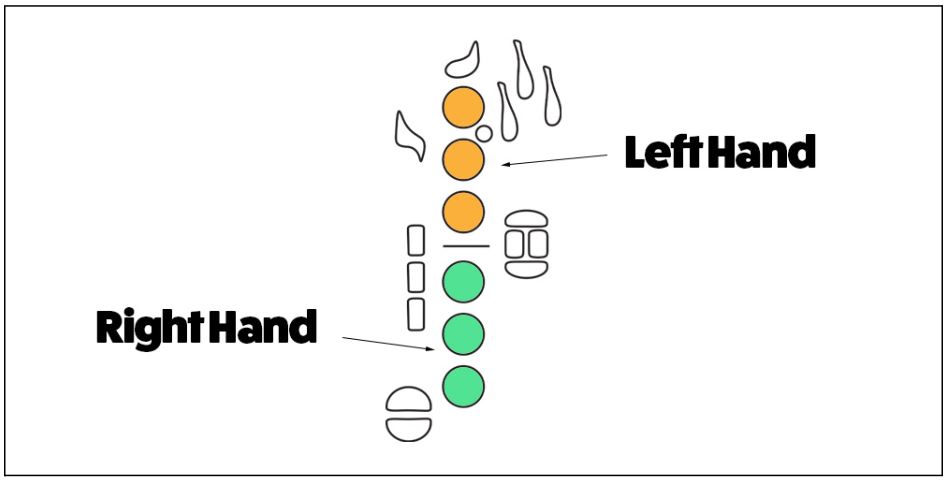
You’ll notice that the finger chart can be broken into “Zones” with each section representing an area of keys on your sax. Start by identifying the first three keys on the left hand (index, middle and ring finger). Then look for the three keys played with the right hand (index, middle and ring finger).
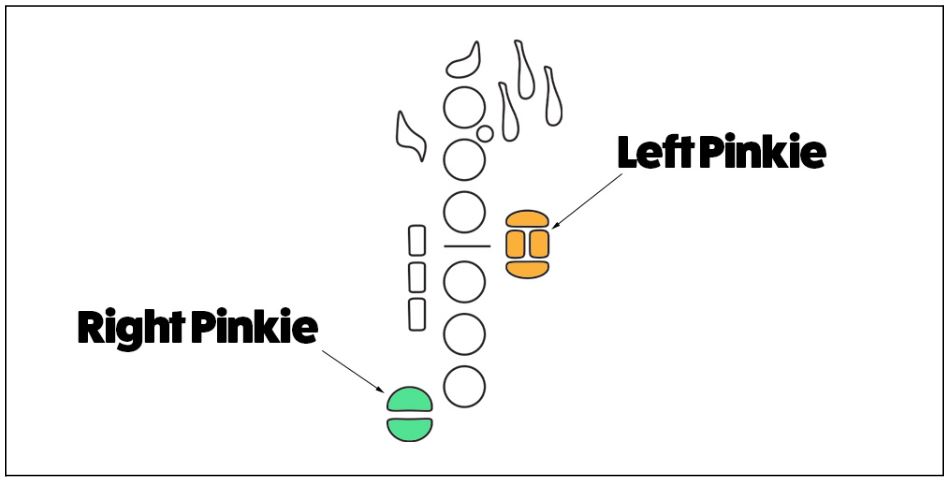
Next, identify the left-hand pinkie finger keys. And then the right-hand pinkie finger keys – these can feel quite hard to reach if you don’t have your hand squarely on the saxophone.
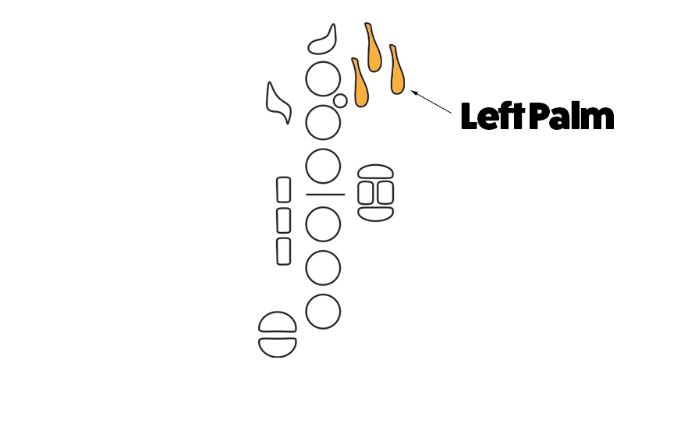
And finally, look for the left hand palm keys. There are three of them, and they should be sitting underneath your palm as you hold your saxophone.
2. Start with the basics.
While the urge to jump into complex melodies can be tempting, beginning with simple scales is beneficial. Using your fingering chart, start by getting comfortable with the first three keys on the right hand. Remember on saxophone, we always add or remove keys starting from the top. So first add your right hand index finger, then your middle finger, then all three with your right ring finger.
Next, add to this your left hand index finger. Continue adding fingers with your left middle finger. And finally have all 6 fingers down by adding your left hand ring finger. These first 6 notes on your sax are the foundation of everything you will play, so get used to the feel of them and how your fingers coordinate to play each note smoothly.
Try running up and down these 6 notes in order. Check your finger chart to see the note names for these notes are B (left hand index finger) down to low D (all 6 fingers).
When you’re ready, use your finger chart to add low C to this and middle C. You now have your first scale!
3. Practice daily.
The more you use the fingering chart, the less you’ll need to rely on it. By practicing regularly, you’ll gradually internalize the finger positions for each note, making playing more intuitive over time.
It’s a good idea to keep your finger chart printed out and on your music stand. Many of our Sax School Members also stick it on the wall of their practice space so they can refer to it frequently.
Use your finger chart whenever you need to know how to play a note or need a reminder of a tricky fingering.
4. Break down challenging sequences.
If you come across a challenging sequence of notes in a song, don’t be disheartened. Use the fingering chart to break down the sequence into individual notes. Practice these transitions slowly, and over time, you’ll be able to play them with ease.
Every difficult phrase will contain only one or two tricky finger transitions, which are where you need to focus. So, isolate the movement you find challenging. It’s a good idea to practice that movement without playing. Feel how your fingers move.
Watch your fingers in a mirror to make sure your hands are relaxed, and your fingers are moving efficiently. Once you refine the movement, move on to playing the notes slowly and build speed gradually.
5. Visualize and play.
A fun exercise is to visualize playing a note before actually pressing the keys. Look at the chart, imagine your fingers on the sax, then play the note. This reinforces the connection between sight, thought, and action.

This technique is especially important for very difficult passages. Like an athlete training for a big race or a gymnast preparing for an event, you need to think through the movement of your fingers in advance. Feel your fingers moving efficiently and smoothly over the keys. Then you will be ready to play it perfectly!
6. Use online resources.
Now that you have your tenor saxophone finger chart and understand the basics, it’s important to put your new skills into action! There are numerous online platforms, videos, and tutorials that use fingering charts as part of their lessons.
Exploring different musical styles on your tenor saxophone can help reinforce your fingering knowledge and help you build your skills. At Sax School, you’ll find a huge range of lessons and courses from all styles, from classical to pop, jazz to blues. Our Members find that by exploring unfamiliar styles they learn so much faster. Plus, they have a lot of fun along the way!
7. Explore alternate fingerings.
As you move on to more advanced music, you may come across some phrases that are very awkward to play. You may even wonder if it’s ever possible to play these smoothly – that is, until you discover the magic of Alternate fingerings! Check out this guide for more help with alternate fingerings for alto or tenor saxophone.
Your finger chart has a bunch of alternate ways to play notes like Bb, C, and F#. Finding the best fingering on your tenor saxophone for these notes can make a phrase that was once impossible to play quickly much more easy.
Spend time getting familiar with your alternate fingerings for tenor saxophone, and be sure to mark which finger pattern you choose on your music. This way, you’ll always practice the correct fingering to make learning faster.
Conclusion
The tenor saxophone fingering chart isn’t just a piece of paper; it’s a tool that can bridge the gap between beginner and pro. By using the chart strategically, understanding its layout, and practicing regularly, you’ll find that the once-daunting key system becomes second nature.