
Ready to jam with me over this classic Jimmy Sax track?
No Man No Cry was a huge hit for YouTube sax star Jimmy Sax. Today we’re going to learn three easy ways that you can start making killer solos over this track. Grab your sax. Let’s get stuck in.
Get 14 Day FREE Trial of Sax School PRO
So we’re going to start easy for our first strategy. No theory – we’re just going to use three notes.
The Notes
On the alto saxophone we’re going to use notes B and C sharp and D. So I’ve got these keys – one, two, three on the left hand, and on the right hand. And I’ve got my octave key on for D.
So if you’re a tenor sax player the notes will be E, F sharp, and G.
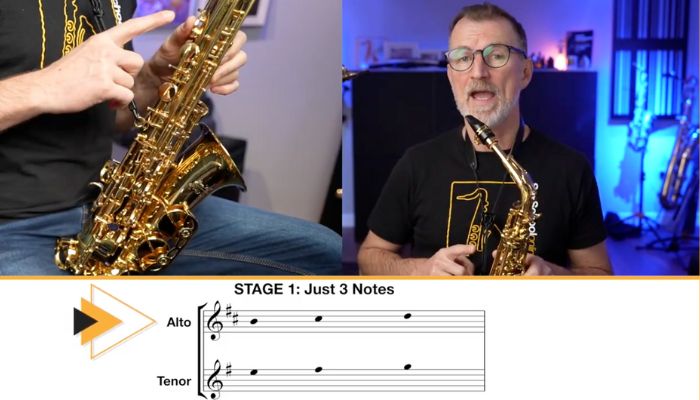
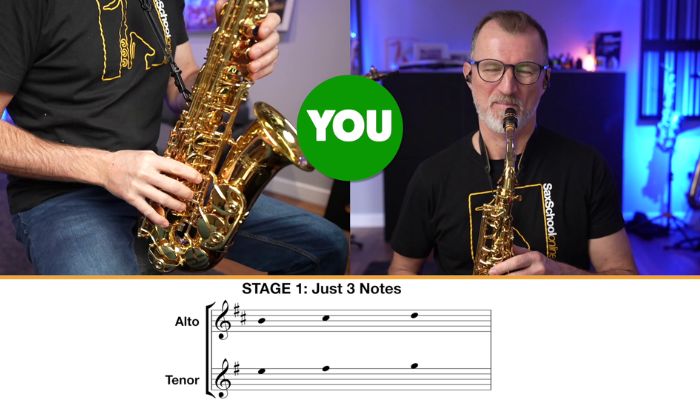
Easy Jam: Stage 1
Okay, let’s get started with our first jam over No Man No Cry.
Here’s how it’s going to work.
I’m going to play the first two bars using those three notes, but just making up a simple melody.

I’m going to keep the notes really easy with just those three notes, and I’m going to keep my rhythms easy too.

Then it’ll be your turn to make up something in your two bars.
Now I’m not going to tell you what notes I’m playing. And please don’t ask me to write out the music for you!
Because the idea here is to use your creativity. Use those three notes and come up with your own idea.

But you can use what I’m playing as inspiration.
After your two bars, it’ll go back to me and then back to you, as we go through this solo two times.
Are you ready? Let’s go!
Awesome. How’d you get on with that?
Now, this might be the sort of thing that you want to do a few times over, to start to build your creativity and your confidence. And the more times you do it, the more interesting ideas you’ll come up with.
Let’s move on to stage two.

Easy Jam: Stage 2
Okay, in the second stage of our No Man No Cry Easy Sax Jam, we’re going to add a couple of concepts.
First of all, we’re going to expand our note choices. So we’ve got five notes to play in the first section.
And secondly, I want to tell you about the structure of the chords and what’s actually going on. Because this will help us to come up with some really interesting note choices.

So for the first section, we are gonna expand our note choices to five notes.
So on the alto saxophone, we’ve already got B, C sharp, and D. We’re also going to add E and F sharp.
So of course on the tenor saxophone, that means we’ve got E, F sharp, G, A, and B.
Form
Now I mentioned we’re going to talk about the form of this solo as well.
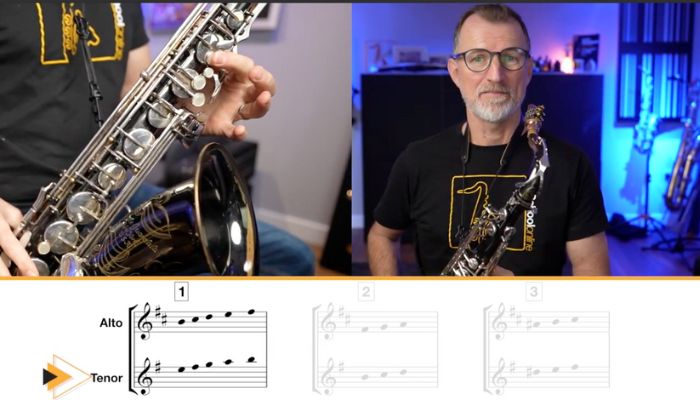
And this solo is pretty simple because it can be broken down into three easy sections.

So it’s a 16-bar solo in total, and the first 12 bars are all the same chord pattern.
And that’s our section number one with the five notes we’ve just discussed.
After that though, we go to two bars of section two, and then we finish with two bars of section three.
Now, in this lesson, we’re not going to go into the chord structures and the anchor notes and how to choose the good notes for passing between the chords and all that sort of stuff.
We cover all of that inside Sax School. So when you’re ready, go check out the courses that we’ve got in there.
Get 14 Day FREE Trial of Sax School PRO
But today’s just about getting started, and having some fun with easy note choices. So let’s just focus on the note choices for sections 2 and section 3.
Note Choices: Alto Sax
So I’m just going to show you three notes for section 2 and section 3 on alto sax.
For section two, we use F sharp, G, and A on the alto.
And then for section three, we use A sharp, (or B flat). So you could use your two fingers on the side key, or your first finger on the B key and that little B flat key.
So that’s A sharp, B, and C sharp.
Listen to how the notes sound for section 2 and section 3.
Note Choices: Tenor Sax
Let’s look at the notes on tenor sax.
So for tenor players, it’s B, C sharp, and D for section two.
For section 3 it’s D sharp (I’m adding my little pinky finger down there) – E and F sharp.
Okay, let’s get stuck in with our second jam for today’s lesson.
So I’m going to pop the track back on again, and in section 1 we’re going still take two bars each. I’ll go first for two bars. I’m going to use those five notes from section one to make up some interesting melodies. Then it’ll be your turn for two bars.
When we get to section two, we’re just going to take one bar each. I’ll go for one bar. You go for one bar.

And then for section three, it’s the same, so I’ll go for one bar and you go for one bar.
Remember:
- keep your melodies simple
- keep your ideas simple
- keep your rhythm simple.
Let’s just have some fun and see what we can come up with.
All right. How did you get on with that?
Isn’t it interesting when you start to add in some new notes?
Plus, don’t you think it’s interesting how in section 2 and section 3 you can pretty much just stick on one note in there and it still sounds good? It’s because the chords are moving and there’s other things happening in the texture of the song.

Easy Jam: Stage 3
For strategy 3, we’re going to take it up a notch, and look at how we can use interesting rhythms in our solos to really bring our solo to life.
And if you listen to the original track with Jimmy Sax, he uses rhythmical ideas all the way through. They are very simple ideas, and he plays them over and over and over.
But it adds a lot of tension and excitement to the solo, and we can do that too.
So we’re going to look at one rhythm that Jimmy uses on his track, and we’re going to learn it here today.
Now, even if you don’t know about reading rhythms and understanding subdivisions and counting and all that stuff – don’t worry about that.
I’m going to show you an easy way to learn it.
This is what the rhythm sounds like. Have a listen.
Okay, so it sounds complicated. But let’s slow it down and I’m going to show you a little trick for learning this rhythm.
We are going to use these words over this rhythm, and I think it might make it easier for you. “I like to play sax in time”. Can you say that with me?
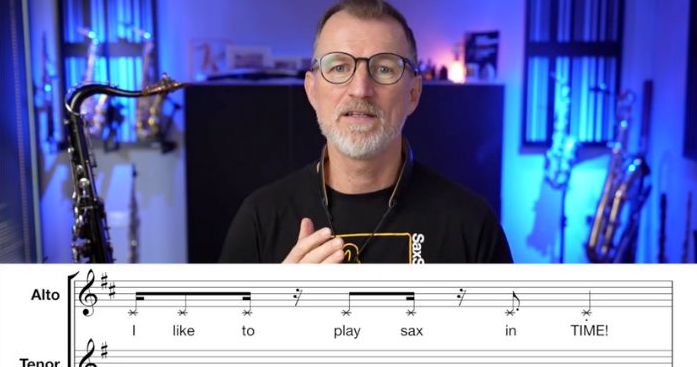
Now there’s an interesting thing happening here. of all of these notes, the first one lands on a beat. In other words, if I’m clapping on the four beats of the bar, the first note lands on a clap.
And the only other note that lands on the clap is the very last note – the word “time”.
SO let’s go very slowly and try clapping the beat and saying the words.
Now try speeding it up a little.
Are you feeling comfy with it yet? It’s okay to practice a little bit. So just rewind the video a little bit if you want to go and check that part out.
Let’s put that into action with our third jam session now.
Now we’re going to start by using that rhythm. I’m just going to use it on a single note and I’ll get you to copy me.
So it’s remember two bars for me the two bars for you.
But then I’m going to try expanding out and looking at different note choices and maybe moving between the notes, using that rhythm. Let’s see what we can come up with. And don’t forget in section 2, it’s just one bar each, and in section 3, it’s one bar each.
Here we go!
Practicing your improvising: Pro Tip
Hey, well done. That’s brilliant. That third jam session is much more challenging isn’t it?
We’ve covered quite a lot of stuff in the lesson today. I’d definitely suggest that you go back and use this lesson loads of times.
Because the more that you practice this lesson, the more creativity you’ll discover in your own playing. And you’ll be able to make more and more exciting solos by combining all of the things we’ve spoken about today.
But I’ve got one final tip and piece of advice for you before we finish up today.

Whenever you are working on your improvising, it’s so important that you focus on keeping your melody lines and your rhythms super simple.
Now, I know it’s tempting to play high and to play fast and to get complicated, but you know what? The solos that work the best are simple and are in time.
Because they’re the ones that are going to feel the most natural to you, and they’re going to feel the most natural to your listener.
And your listener will be able to connect with them too.
So as you’re working through any improvising lessons like this one, please do go slow. Keep it simple and keep it rhythmical. And then it’s going to be a lot more fun.
I’d love to help you with more lessons like this inside Sax School. So when you’re ready to go, check out the full range of lessons. Get a 14 day free trial here.